
Settings and profile
Updated 27.10.2026
Entrance
You can log in via Telegram or MAX.
On the computer, the “Login” button is at the bottom of the side menu and opens the “Login to Account” window. There is a Settings tab “on the phone”, and a “Sign In at VISH” card at the top.
“Log in via Telegram” in the browser opens a Telegram window in which you need to confirm your login. In the installed application and where the window cannot send a response back, the application goes to the Telegram login page, and after confirmation it returns — you are already logged in. The next attempt will also be made in the browser if the confirmation has not been verified. “Log in via MAX” shows the "Open MAX and confirm login with the “Yes, it's me”" button with the “Open MAX” button; if it's more convenient, click “Enter the code manually”, copy the code and send it to the bot with a message. The code is valid for 3 minutes, after which you will “receive a new code”.
In response, the bot writes from which device (browser and system) and at what time in Moscow the login started, and asks if this is you: “Yes, it's me” who completes the login — go back to the app, you're already logged in; “No, it's not me” who cancels the attempt. Click “Yes, it's me”, only if you yourself have just opened the login window on this device. If someone sent you a link or code, click “No”: you can only log in in the browser where you started logging in, so someone else's link or forwarded code does not give anyone access to your account.
If you can't log in via Telegram, it says under the button what happened and what to do: check the Internet or VPN, confirm login again, wait a minute (there are many attempts from the same address in the general VPN or campus network) or log in via MAX. The “Try again” button starts logging in again. If the error repeats, rewrite the “Code line for support: ...” and send it via feedback: we will use this code to find your login attempt.
The “Log in at VISH” inside MAX page also shows the device and the start time of the login above the “Confirm Login” button. If you don't open it from MAX, it will prompt you.: “This page opens from MAX”.
If the server completed logging in while you were using the application, the message “Session expired will appear, and you couldn't extend it” with the “Log In again” button. At the same time, the schedule is working, the typed text is saved; the button opens the same login window as “Log” in.
Exit: the “Log out” line (red, with the exit icon) is in the settings, in a separate group: on the phone immediately under the profile card, on the computer in the list on the left, under the sections. Clicking opens the confirmation: on the phone — the bottom window, on the computer — a small window in the center. Logging out immediately completes logging in on this device, while on others you remain logged in. While you are using the app, the login is imperceptibly extended by itself.
Profile
The computer has a “Profile” page in the “Management” section (shown only after logging in): name, nickname, role, login method, and, if the account is associated with a teacher or student, their cards; at the bottom, the Profile Settings line leads to Settings “→” Profile. The same data is displayed on the right in the settings when the profile card is selected in the list on the left: account block and profile editor. There is no separate page on the phone — the card at the top of the “Settings” tab opens the “Profile” screen with the same data. The title of the card and page is the full name (the long name is moved to the next line), under it is the “@nickname”: clicking on it copies the nickname, the application confirms this with a notification.
Public card
A public card is a short page about you at /u/<address> that can be opened by anyone with a link. By default, there is no card: the link opens the “Profile not found or hidden” page, and all blocks are hidden.
The card is configured on a separate page: “Settings” → “Profile” → “My public card” (address /settings/profile/card, is also located by the settings search). The “My public card” line is located immediately under the account card in “Settings” → “Profile” (after logging in, on the phone and on the computer), and on the computer — also on the “Profile” page. On the right side of the line is the status: “Disabled”, “Visible by link”, “Visible by link and in search”, or “Hidden by moderator”.
- That's how others see it. There is always a preview on the page — exactly what an outsider will see on your link. On the wide screen, it stands next to the settings, on the narrow one — at the top, in the window that opens “the entire” screen. While the card is turned off, the preview shows everything that it could show, marked “Off”; when turned on, it follows the marked points, and then follows the “eyes” of the blocks. The changed text appears in the preview after “Save”.
- Enabling is a single action. While there is no card, there is only one suggestion on the page and the “Enable card” button. She reveals her consent right on the page: a list of “What to show”, where no item is marked in advance (you can “select all” of them), a separate item to “Show in Yandex and Google search” (without it, the card opens only by clicking on the link), a link to the consent text (PDF) and the “Enable” and “Cancel” buttons. “Enable” immediately shows a card with marked blocks.
- When the card is turned on. At the top is her address and the buttons “Copy the link” and “Open as others see” (opens the card in a new tab); what each one does is indicated by a popup hint on the computer and a long press on the phone. Below, two of the switch is “Visible on the link” , you turn it off and the cards will not (it acts immediately and withdraw the consent); “Visible in the search for” Yandex and Google will be able to show it in the results.
- Search engines. The card page is collected by the server every time you open the link, so everything that you have hidden or disabled disappears from the very next opening; the card leaves the search engines the next time they crawl, and they may have a copy for a while. While “Visible in the search” is disabled, the page is closed from indexing (noindex). Enabled — the card is included in the search no earlier than a day after activation and only if the name is visible and there is at least one completed block: title, “About yourself”, links, skills or interests. after the moderator has shown the hidden card again, the day is counted again. Page title — “Name — Role — VISH”.
- What's on the card. Each block has an “eye” on the right (“Visible”/“Hidden”): it decides whether others will see the block, and it is triggered immediately. Blocks: photo, first name (full name, first name and the letter of the last name, or just the first name), role, institute with course and group or department, link to the teacher's card, title, “About yourself”, links, skills and interests. While the card is turned off, the “eyes” are inactive.
- Text. The title is up to 80 characters, “About yourself” is up to 1000 (plain text), up to 6 links with https only (type — GitHub, Habr, Telegram and others — is determined by the address, the site is always visible next to the name), up to 15 skills and up to 10 interests (Enter or a comma completes the tag, at the bottom there are hints). The text is saved with the “Save” button and does not change who sees what.
- The card's address. At first it's random. “Changing an address” takes from 3 to 30 characters (Latin letters, numbers, “_” and “-”), it immediately tells you if the address is available; you can change it no more than three times a day, the old address leads to a new one for 30 days. “Share” provides a link, a “Share” system window, and a QR code; while the card is turned off, the button is inactive.
- Confirmation. The role with a check mark (“Teacher ✓”, “Employee ✓”, “Student ✓”) is confirmed by an employee of the institute; the name of the teacher and employee is taken from his card. Without confirmation, you can identify yourself as a student or employee, but without a check mark. The “Confirm that I am a teacher, employee, or student” button leads to the “My Role” page.
- Translation. The card texts are shown in Russian, English, or Chinese — in the reader's language; the “Show Original” button returns the author's words.
- Hiding by the moderator. If the card was hidden by a moderator, the reason will appear on the page; as long as it is hidden, no one will see it, but you can turn it off at any time.
- Claim. On someone else's card, the log-in has a “Complain” button; the author will not know about the complaint or who sent it. For more information, see the Feedback and Requests page.
- If the cards can't be enabled yet. While the consent text has not been published on the server, there is no “My public card” line in the settings, and the page itself says: “Public cards are not available yet”. Profile moderators see a line marked “Consent text has not been published” and on the page they see which server and application settings need to be set.
The card is stored on the server and is not included in the settings synchronization, so the old device will not turn it back on when it returns to the network.
Settings
The “Settings” page opens from the computer from the bottom of the side menu, and from the phone with a tab. It looks the same on the phone and on the computer: gray background, white group cards with thin lines, switches in the form of a familiar iOS toggle switch. While the screen is loading, its blank is visible instead of the twister.
The main list
There is a profile card on top; without logging in, “Log in to VISH” with the signature “Group, Settings, and notifications on all your devices”. Below are sections with colored tiles, and some of them have the current value on the right.:
- “Profile” (after logging in);
- “Schedule and institutes” — your group and subgroup, for “example, School of Data Analysis-211 · p/gr. 1”;
- “Notifications” — channels are enabled, “Disabled”, or the warning does “not reach” if notifications are enabled but cannot arrive.;
- “Appearance” is the theme;
- “Calendar and data” (where there is no personal calendar, the section is called “Data on the device”);
- “Access” (after login);
- “Support”;
- “About the app” — version.
At the very bottom, Log “out of your account” and “Delete your account” (after logging in).
Computer Settings
There are two columns on the computer settings: on the left is a list (profile card, sections with colored tiles, Log “out and” Delete account below), on the right is an open screen. The list is fixed and does not scroll with the screen; the selected row is highlighted, and the backlight smoothly moves from one row to another.
- The width is calculated by the page itself, not by the window, so with the collapsed side menu, the layout can become more spacious. From 1000 px — full view (280 px list), from 720 to 999 px — compact (248 px list), already 720 px — like on a phone: first the list, then the screen with the “Back” button.
- Collapsing and expanding the side menu does not change the address or reset scrolling.
- “/settings” opens the section that you last used during this session, and if there is no such section, then the “Schedule and institutes”.
- If the screen on the right is broken, the error is shown inside the right part, and the list on the left continues to work: select another line.
From the keyboard. The up and down arrows, Home and End go through the list of sections, the letter goes to the section for this letter, Enter opens the section. Esc takes you back a step: from the search to the list, from the page inside the section to the section, from the section to the list. After the transition, the focus is immediately on the heading of the open section. Hints above the line and above the “Back” button appear both when hovering and when focusing on the keyboard.
The list of partitions on the computer is the same as on the phone.
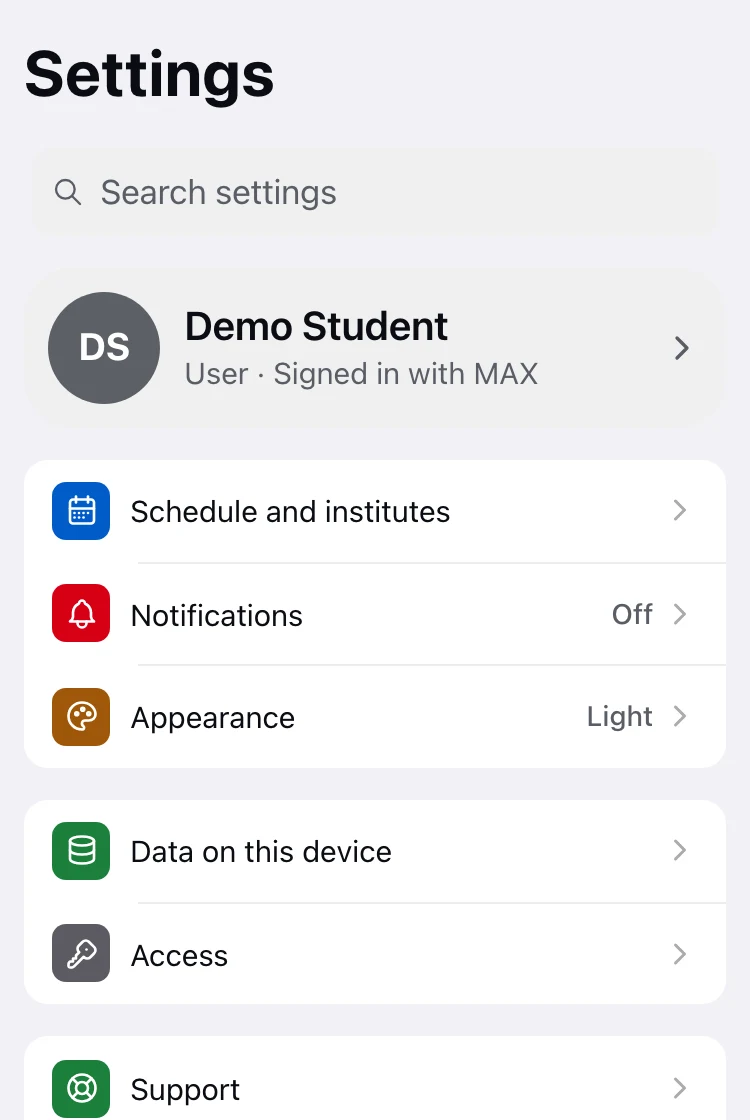
What's in the sections
- “Profile” (after logging in) — the account block, the “My public card” line with its status (see above), the “My schedule” line (summary of the group and subgroups; clicking opens the “Schedule and institutes”) and the “Profile” group. In the “Profile” group, you can see who you are in the application: “Me” (switch “Student”, “Teacher”, “Employee” or “Not specified”), the “Institute” and “Me in the list of teachers”. Each selection is saved immediately: on this device and in your account, so it will also appear on other devices. “I” am who you say I am; it does not change access to functions (rights are granted by an application on the “My Role” page). The “I in the list of teachers” refers only to the profile and is not a schedule filter: the teacher's schedule is selected in the schedule header. There are only existing institutes in the institute selection; the previous code is also there, for example, the iitc “will” prompt the “IITC now”. If an institute that no longer exists has been saved in the profile, the application will replace it with its successor once (IPSS → ISTI).
- “Schedule and Institutes” — “My Schedule” group: “Group” (select your group) and “Subgroup” (“All”, “1” or “2”; the row is visible only when the group is selected). Select “1” — the classes of the 2nd subgroup will be hidden from the schedule of your group, and vice versa; classes without a subgroup are always shown. A subgroup only affects your group's schedule: a group opened by clicking on a link or from a search, and the teacher's schedule show all the subgroups. When you select another group, the subgroup is reset to “All”, and account notifications start coming for the new group. Below is the Time “format”: “24 hours” or “12 hours” (switch in the line) — and the “Institutes” are right in the list: which institutes to show in the search for groups and lists; the chip removes “all” restrictions. The schedule of the selected group is always visible.
- “Notifications” are a group of “Schedule changes”: push on this device and bots in Telegram and MAX (without logging in, Telegram and MAX have lines with the “Log” In button). If notifications can't arrive, there is a button instead of a dead switch that fixes the cause.: “How to enable” opens the “How to enable push” page with the steps for your browser and the “Check again” button (it checks itself when you return from the system settings), “Install” it in Safari on iPhone, “Repeat” if the subscription failed. “News” group: “News notifications (on” the right — where the news comes from and how many subscriptions; on the page — a general toggle for “Notifications and news icons”, subscriptions, summary, silent hours and channels) and “News Feed”: your institutes for “My”, the toggle for “Show news is only RUT” and a line for “News Notifications”. The news itself is where it is included, on the “News” tab; for more information, on the “News” page of the directory. “Chatbots —” links to a chat with a bot in Telegram or MAX, with an arrow ↗. For more information, see the Notifications page.
- “Appearance” — “Theme”: “System”, “Light” or “Dark” right in the line (“System” — as on the device). The “language” and “Accent color” open on separate pages: the languages are signed on their letter, the color has ready-made options, a color code, a preview of the button and links, and “Return the standard color” (the application darkens the color a little to make the text readable). “Motion” “Animation” Group: Turn them off and there will be no smooth transitions or festive effects. Below is the “Holiday Effects” group (see the next item). The “Show Hints button returns” the hints to the buttons again, one at a time, and responds “Ready” for two seconds.
- “Festive effects” — light particles on top of the page: ghosts, bats, pumpkins and bones from October 26 to November 1 and snow from December 1 to the end of February (slightly thicker from December 25 to January 8); dates are calculated according to Moscow. They do not accept clicks, are not read by the screen reader, stop in a hidden tab and are shown on all pages of the application, including analytics, news and settings. While you are typing in any field (including in a chat with AI) or a window or slide-out panel is open, the effects smoothly disappear and return when you are done. The figures do not cover the buttons, links, fields, and switches — they disappear above them, and become almost transparent above the text; this does not change the snow. The traffic saving mode also disables the effects.
- The “Festive Effects” group in the “Appearance” section is visible all year round. “Show” is enabled by default; if “Animations” are turned off or “Motion Reduction” is enabled on the device, it says under the switch that effects are not shown and why. While it is on, the “Number” below is “Small” (by default), “Medium” or “Large”, and the “Size” is “Small” (by default), “Regular” or “Large”; there are always 768 px fewer particles on the screen: by Halloween, when there are “Few”, there are about five figures on the computer and three on the phone. The preview window immediately shows what is selected, and “Show on Schedule” opens the schedule and shows the effect there for 10 seconds — even out of season. The caption under the group says that it is now (“Now: Halloween...”), or when the following effects will be, for example, there are no “holiday effects now — the following: winter from December 1st”. The selection is remembered on the device and in the account; a search through the settings finds a group based on the words “effects”, “holiday”, “ghosts”, “snow”, “Halloween”.
- “Calendar and data” — where the personal calendar is enabled, the “My Calendar” group and “Backup” (see My Calendar); the group “On this device” is “Storage” (how much space is occupied by everything that the application holds on this device; there is no row if the browser does not know how to evaluate it) with the breakdown below — “Application”, “Offline Schedule”, “News and pictures”, a “Map”, a “Calendar, and so” on (lines with a zero are not shown; on the iPhone, the browser reports the size approximately, so the “Calendar and so” on are the difference and may be inaccurate), “Clear the cache” and “Reset the settings” (see below). “Get to know each other again” on the phone here.
- “Access” (after logging in) — “Connected applications”: sites and applications that you have logged in to through VISH, and the “Disable” button for each (see Logging in through VISH); “My role”: application for the role of a teacher or employee and its status, and “For developers”: API key request (or release immediately if the role this allows) and a link to the API documentation. The computer has the same pages — the “My Role” and “Developer” side menu items in the “Applications” section.
- “Support” — “Feedback”, “My requests” (after logging in; a list of your requests with responses), “Share the application” and “Install the application” (while the application is not installed). On the computer, “My requests” and “Feedback” are also available in the side menu. For more information, see the Feedback and Requests page.
- “About the application” — “What's new” (see below “What's new”) and “Version”: clicking copies the version string for the request (number, system and browser or installed application) and responds “Copied”. The app searches for the new version itself (see the “App update” below). On the production site, the version is only a number, for example “0.11”; on the test stand, the number of the next sprint is marked “dev” and a short build label, for example “0.12 dev · a1b2c3d”; it is also written in the basement and in the bug report. Below are the “Legal documents”: The “User Agreement” and “Privacy Policy” are visible even without logging in. After logging in, there are accepted versions with dates and withdrawal of consent (see “Consent” below). There is also “Analytics (Yandex. Metrica)”, see “Analytics” below.
Without a network, the switches that are stored on the server and dangerous actions remain in place, but they are not pressed and explain: There is “no network. The switch will work when it appears”. When the connection is back, they work on their own again.
What's new
“Settings” → “About the application” → “What's new” (address /settings/about/changelog) — a list of changes to the application by version: top “In development” (only on the test bench), below the version with a date, for example “Version 0.12 · October 20, 2026.” In each version, the changes are divided into groups of “New”, “Improved” and “Fixed”; the item may have a link to the application or reference page and a screenshot in a light or dark theme, as you have. Clicking on a picture opens it to the full screen, and you can zoom in on it. The latest versions are shown first, and the “Show Earlier versions” button adds the previous ones.
- The red dot. If a version has been released that you haven't opened yet, the “What's New” line in “About the app” and the version number have a red dot at the bottom of the main settings list on your phone. It disappears as soon as you open the list. “The Development” section does not include a point.
- The card has been updated. When the application has been updated and a version newer than the one you have already seen has been released, a small “What's new in 0.N” card appears once with the main one from this version. It does not close the screen: you can close it or open the entire list from it. At the very first launch, there is no card for “the Development” section and for the version with only fixes.
- The same list opens the address /changelog.
- If there is no list of changes on the server yet (the old version of the platform), the “What's New” line, dot and card are not displayed.
- If the booth has not received the list of changes yet, the one with which your version of the application is assembled is shown, marked with the “List of changes with which this version of the application is assembled”.
- If the list is not there, the screen says the “List of changes has not yet been published...” and suggests “Opening the manual”.
- If the download failed (for example, there is no network), there is a “Repeat” button.
- The items in English and Chinese are translated automatically, as indicated by the mark; the item that has not yet been translated is shown in Russian.
Search by settings
There is a search field above the list of sections: on the phone — under the large “Settings” heading, the full width of the screen, on the computer — in the left list under the heading; on the computer, the “/” key opens it.
- While something is typed in the field, a flat list of results is shown instead of a list of sections. Each has a colored tile section, a name and a path through “›”, for example, the “appearance of " Theme”.
- Searches by names and keywords in Russian, English and Chinese immediately, regardless of the language of the application: “dark” and “主题” find the “Topic”. A word typed in the wrong layout (for example, “ntvf”) also finds the “Subject”.
- It shows only what opens specifically for you: without logging in, there is no “Profile”, “Access”, or “Delete account” in the results, as well as none in the list of sections.
- The result opens the desired screen at the address of type “/settings/…#строка”: the line scrolls to the visible part, highlights and gets focus. The typed text is saved: if you go “back”, you will return to the same search.
- The number of items found is announced to the auxiliary technologies as “Found: N.”
- If nothing is found, the field suggests the next step: “Ask in the AI chat” (when the AI chat is turned on) opens a chat with a blank “Where in the settings: ...?” — it is not sent until you click “Send”; when the AI chat is turned off, instead there is “Feedback”.
The first launch
The introduction is only available in the phone version; it is not shown on the computer either at the first launch or later. At the very first launch on the phone, the app first asks “Who are you?” — three large cards with explanations in one line: The “student” (the “schedule of his group and audience”), the “Teacher” (the “schedule of classes and free classrooms”) and the “Employee” (“Schedule, classrooms and office sections”). The selected card is marked with a tick and responds to a tap. The selection is saved in the profile as a role and can be changed later. “Skip” to the top right corner of the first screen opens the app immediately, with an empty profile. If you have followed a link to a group, teacher, or classroom, the question is not shown: it opens what is in the link.
If you have chosen a “Student”, the acquaintance continues in three steps:
- “What institute are you at?” — choose your institute, then we will show the groups only it.
- “Your group” — start entering the group code or part of it. The case, hyphen, and layout are not important: they can be found when typing in a different layout. If nothing was found, the message “Nothing was found” will be displayed, and if the list did not load, it did “not load. Repeat”.
- “Your subgroup” is “Subgroup 1”, “Subgroup 2”, or “All of the group's classes”. This question is asked only if the group has subgroup classes this week or next; otherwise, the acquaintance ends after the group selection.
If you have chosen a “Teacher”, one question is asked — “Who are you among the teachers?”. Start entering your last name or first name: the search finds it in a different word order, and if “e” is written instead of “E.” The selected teacher is recorded in the profile (“I am in the list of teachers”), and the institute itself is substituted — the one in which he leads the most groups. If nothing was found, the message “Nothing was found” will be displayed, and if the search failed, it did “not load. Repeat”.
If you have chosen an “Employee”, one question is asked — “Which institute are you at?”. The selection is recorded in the profile, and the application opens on the Download page with the “Free Now” “tab”. This start page may still be changed. It opens after the optional steps below.
At each step, there is a “Back” and “Skip”: the app opens immediately, and what you have already selected remains in your profile. Everything you select is saved in your profile — the same values as in the “Profile” and “Schedule and Institutes” sections above — and after logging in, it is transferred to your account.
The steps follow each other in a smooth shift, and the overall bar at the top shows how much has been completed (“Step 2 of 4”). When the “movement in the system decreases”, the steps simply change without shifting.
After the profile questions, there are two more optional steps; each one is shown only if they have something to offer, otherwise they skip it themselves.
- “Notifications of changes” are only available if a group is selected in the profile (for the student this is the group from the previous steps, for the teacher and staff it was already selected earlier) and there is something to offer. The same lines as in the “Share” Group window: links to bot VISH in Telegram and MAX for your group (the bot signs the chat and does not require login) and a push notification switch on this phone. It is not necessary to include anything: “It” goes on to the next step with any choice.
- “Install the app” — the hint depends on the device. In Safari on iPhone: “Tap "Share" in the Safari toolbar”, “select "To the Home screen"”, “Tap "Add"” and the Done button. In Chrome on Android, where the browser suggested installation, there are “Install” buttons (opens the browser's system query) and “Not now”. If the application is already installed or the browser is different, the step is skipped.
“Skip” at the top still closes the acquaintance entirely, and “Then” it's “Done” and “Not now” it's closed after the last step.
The acquaintance you have started is not lost when you reload the page. You can go through it again on your phone in “Settings” → “Calendar and Data” → “Reacquaint” yourself; the application works as usual.
Clear the cache
The app stores copies of the schedule, news images, and map data on the device so that they can be opened offline, and keeps them within limits: each storage has a size and age limit, and the oldest copies are deleted themselves. “Clear Cache” first asks for confirmation to “Clear cache?” and after “Clearing”, writes next to the “cache is cleared”. It deletes the saved schedule for offline mode, news images, and map data. They will be downloaded again when needed (the schedule will not open until then). The app itself, calendar events, notes, and settings remain.
Reset settings
“Reset settings” first asks for confirmation “Reset settings?” (on the phone — the bottom window, on the computer — the window in the center) and after “Reset”, writes next to the “Settings reset”.
- Resets: theme, accent color, time format (for 24 hours), animations and festive effects (included, quantity is “Small”, size is “Small”) and the choice of institutions (everything is shown again).
- What remains is: the language, the selected group and teacher, everything about you in your profile (role, institute, group, subgroup, teacher), notifications and subscriptions, account login, and a choice about analytics.
Section addresses
Each section of the settings has its own address of the type “/settings/…”, for example, “Settings” → “Support” → “My requests”. You can bookmark it, send it to another person, or open it from the bot button.
- “It goes back” up a level, and if you come inside the settings, take a step back, and the screen remains scrolled where you left off.
- The link to the string (c#) scrolls to it, highlights it, and puts the focus on it.
- The section that is not yet in the app shows the title and leads to a higher level.
- An address that doesn't exist opens the nearest existing section.
What is different on the phone and on the computer
- Layout: on the phone, the settings go on one screen, on the computer — the list on the left and the screen on the right (see “Computer Settings”).
- Profile: on the phone there is a card on top of the settings, on the computer there is a card in the list on the left, plus a separate “Profile” page; the “Profile” sections (with the “My Public card” line) and the “Schedule and institutes” are the same in both places.
- “My role”, “For developers”, and “My requests”: in settings (“Access” and “Support”), both there and there; there are “☰” more menu items on the phone, and side menu items on the computer. Addresses “/profile” and “/my-tickets” on the phone automatically turn into “/settings/profile” and “/settings/support/tickets”; on the computer, they remain their own pages. The old address “/access” both leads to “My role” (“/role”), and the API key is on the “Developer” page (“/developers”). The role and API key are also in “/settings/access”.
- “Getting to know each other again is only possible on the phone: there is no dating” on the computer.
- Confirmations (exit, reset, withdrawal of consent, account deletion): on the phone there is a lower window, on the computer there is a window in the center.
- Login: on the computer there is a button at the bottom of the side menu, on the phone there is a card to “Enter VISH” in the settings.
- Analytics: permission is asked everywhere, there is an analytics switch in “About the app” both there and there; on the computer, the question card is in the lower—right corner, on the phone - above the lower tab bar.
Installing the app
The “Installation Instructions” page in the “Support” section describes the steps for iPhone, Android, and computer and contains the “Install App” button where the browser supports installation. On iPhone: Open the website in Safari, tap “Share”, select “"Home" on the screen” and “Add”. On Android: open the website in Chrome, menu “⋮” → “Install the app”. On your computer in Chrome or Edge — the installation icon in the address bar.
While the app is not installed on your phone, the “Set VISH line may appear on the schedule page on the Home screen” with the “Install” and “Hide” buttons. It is shown only from the second visit and only when a group or teacher is selected, in one line and not on top of the message about the lack of communication. “Hide” removes it on this device for 30 days. The same suggestion is available in “Settings” → “Support” → “Install the app”.
After installing the app on your phone, you will see the “Scroll Through the days” prompt once, indicating that the schedule days are switched by swipe.
Updating the app
The app searches for a new version by itself: at startup, every time you return to it (you switched back to the tab or to the app, the network returned), and every 20 minutes while it is open. While you're using the app, it doesn't reload anything by itself.
When the new version is downloaded, a calm Update line appears at the top with “an” Update button and a cross. “Refresh” restarts the application on the new version and opens the same screen (on the computer, this is explained by a hover prompt, on the phone — by a long press). The cross hides the line until the next run. If there is no connection, the line There is “no connection remains at the top, we show the saved”, and the line about the update is waiting.
If you don't click “Update”, the new version will open the next time you run it. The installed application puts it on even before something appears on the screen. In the browser, when all tabs are closed VISH: while another tab is open, the old version may work in it, so the update tab is only offered.
If the installed application on this device has been running on the same version for more than 7 days, it searches for a new one on startup and waits for it no longer than 4 seconds — no more than once a week, even if there is no new version. If you haven't downloaded it, the app opens as it is and will offer an update when it is downloaded.
User Agreement and Privacy Policy
On a computer, there are links to them at the bottom of every page. On the phone, at the end of menu “☰”, in the “Support” section.
Consent
The log-in schedule is open to everyone and requires nothing. To use the account, you need to accept the documents.
The first time you log in (Telegram or MAX), a screen opens “Before you start” with links to the “User Agreement” and “Privacy Policy” and a separate checkbox I “agree to the processing of my personal data” with a link to the consent text. The checkbox is not checked in advance, and until you check it, the “Accept and Continue” button is unavailable. The app does not work with the account without consent: you can only click Log “Out”.
If the document has been updated, the next time you launch the application, the “Documents Updated” screen will appear with a list of changed documents. You need to read the new versions and confirm again.
Accepted editions and dates are visible in “Settings” → “About the application” → “Legal documents”. Consent can also be revoked there.:
- “Revoke consent to the profile” — profile data (for example, age and interests) is deleted, the application continues to work.
- “Revoke consent and delete account” — after two confirmations, the account, settings and subscriptions are deleted. This cannot be undone.
Analytics
Yandex.Metrica helps you understand what needs to be improved in the application. She sets cookies, so the application first asks for permission and does not connect Yandex.Metrica until it responds — on the computer and on the phone, on the tablet, in the installed application and in the Telegram and MAX mini-applications.
When you open it for the first time, the “We want to connect Yandex.Metrica card appears: it sets cookies and helps you understand what to improve in the application. Everything works the same way without it.” On the computer, it is located in the lower right corner, on the phone — above the lower tab bar. The link in the card opens a cookie document (“Learn more about cookies”), and until it is published, it opens the “Privacy Policy”. Click “Accept” or “Reject” — the app works the same for any response. If a notification is shown at the top that there is no network or the session has expired, the card will wait until it disappears.
The answer is remembered on this device, in the browser, and not in the account: you do not need to log in for this, and the question will appear again on another device. “Resetting the settings” and logging out of the account does not change it.
You can change the answer at any time: “Settings” → “About the application” → “Analytics (Yandex. Metrica)”. If you turn off the switch, the app immediately stops sending data to Yandex.Metrica and deletes its cookies; yandex.Metrica stops working completely the next time the app is opened.
What yandex.Metrica learns after “Accepting”: which pages are opened and which actions are performed, without names. The page address is sent to her without search and filters, without the group, teacher, and record numbers, and without anything after “#”, and the page title is not sent at all; only the tags of the advertising campaigns (utm) remain if you came from such a link. Session recording (Session Replay) is disabled.
Deleting an account
You can delete an account without revoking consent: “Settings” → “Delete account” — a red line with a trash icon in a separate group at the very bottom of the settings screen (on the phone — after the “Legal documents”). It's signed: “Deleting an account permanently removes your profile, notes, settings, and subscriptions.”
- The first window explains what will be deleted: profile, class notes, settings and subscriptions, as well as the rest of the account data. Click “Continue”.
- The second window asks you to confirm again. Click “Delete Account”.
Deletion cannot be undone. After that, the app logs out of the account on this device and deletes the local account data; on other devices, the login stops working. If the request fails, you remain logged in and can try again. The schedule is still open without logging in.
Verified: 2026-10-26, PWA 35ccb942, platform e5a25d2e._